A pool table is not a piece of furniture you slot in. It is a piece of architecture you build a room around, and the rooms that work best are planned with a tape measure, a flashlight, and a willingness to walk the cue path before the truck shows up. This guide walks through the planning decisions that matter most, in roughly the order they should happen.
The room can be a basement, a finished bonus space, a converted garage, a great room, or a purpose-built billiards room. The principles are the same. A table that plays well wants clearance on every side, light over the bed, a quiet floor underneath, and a layout that does not turn the room into a bottleneck.
Measure the Room Before You Pick the Table
The right starting move is to measure the room as it will be on installation day, not as it is now. Move the existing furniture out, walk the perimeter with a tape, and write down the working dimensions on paper. Account for the things that intrude on play but do not show up on a floor plan: doorways, columns, low soffits, fireplaces, built-ins, and the swing of an adjacent door.
Cue clearance is the dimension that breaks rooms. With a standard 58-inch cue, you need roughly five feet on every side of the playfield for a comfortable stroke. That converts to room minimums in the range of 13 by 16 feet for a 7-foot table, 13 feet 6 inches by 17 feet for an 8-foot table, and 14 by 18 for a 9-foot table.
Those numbers are minimums. They do not account for spectator chairs, a cue rack on the wall, or the path from the door to the bed. If you can give the table six feet on a side, you will compose a more livable room. If you cannot, a shorter cue can preserve play on the constrained side. The detailed table-by-table breakdown is at the minimum room size guide.
Walk the Cue Path Before the Cabinet Arrives
A measurement on paper is not the same as a measurement in the room. The reliable way to confirm a layout is to mark the playfield footprint with painter's tape and walk the cue path on every side. Each side of the table should accept a full back-stroke without the cue clipping a wall, a door, a bookcase, or a piece of trim.
Take a broomstick or a cue and physically rehearse the stroke. If you bump a corner of a console table on the long rail, the console table will move on installation day or the table will not fit there. If your back-stroke hits a doorway opening, an installer cannot fix that with leveling.
This is the single planning step that prevents the most regret. A room that scans as plenty large can still constrain play if a single corner intrudes on the cue arc, and the time to find that out is before the truck arrives.
The Light over the Table Is Not Optional
Overhead light determines whether a room reads as a finished billiards room or as a table dropped into a basement. The fixture should run lengthwise above the table, hung at a height that puts the bottom of the shade about 32 to 36 inches above the bed. That places the light low enough to wash the entire playfield without blinding a player at eye level, and high enough that no one swings a cue into it.
A long pendant or three-light fixture, sized to roughly two-thirds the length of the table, is the conventional choice. A single chandelier scaled to the room can work in a more formal space if the bulbs are diffused and the fixture sits at the right height. Track lighting alone almost never works because it casts hard shadows from the rails onto the playfield.
The detailed treatment of color temperature, lumens, fixture types, and dimming is in the lighting guide. The short version: 2700K to 3000K, lumens enough to read a chalk dish across the room, dimmers on every circuit, and a fixture installed before the table is delivered so the installer can position the cabinet under it.

View the product
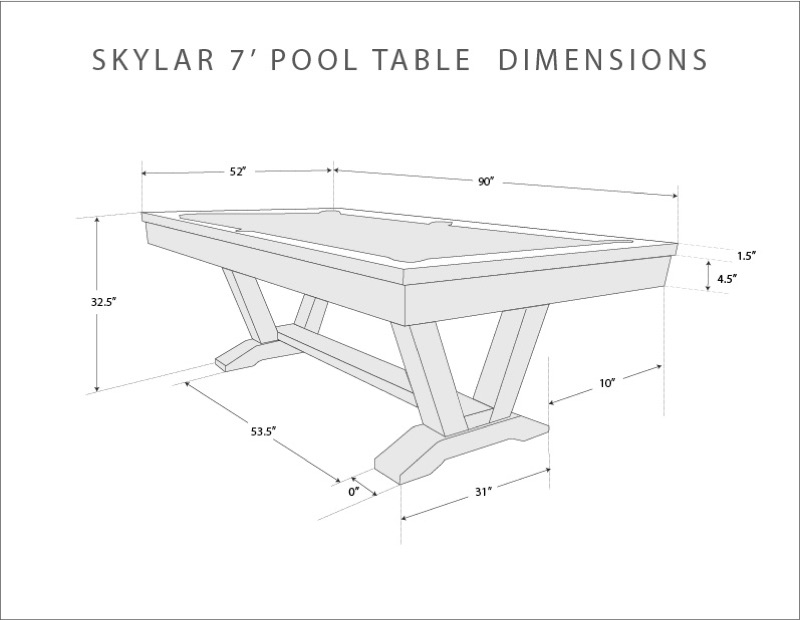
The Skylar
Clean Lines. Convertible Top. Modern in Every Detail.
Flooring Should Be Quiet, Stable, and Easy to Live With
A pool table sits on three to five hundred pounds of slate plus the cabinet, and the floor under it has to carry the load without telegraphing every footstep into the room. Solid hardwood, engineered hardwood, tile, and concrete all work. Carpet over a slab works. Carpet over a sprung subfloor in a basement bonus room works less well, because the subfloor flexes underfoot and a pool table wants a floor that does not.
If you are starting from scratch, think about acoustics as much as material. A room with hard surfaces on every side will echo every break and every cue strike, and after a year you will be tired of the sound. A rug under a pool table is unconventional but legitimate if the rug is low pile and runs at least 18 inches past the cue stroke on every side. Most rooms benefit from acoustic absorption on a wall or a ceiling, not under the table.
If you have an existing floor, the question is whether it can take the load. A standard residential floor system is engineered to carry a pool table without reinforcement, but a converted attic or a deck-supported addition is a different conversation. Your installer will check level on delivery day and will tell you if the slab needs shimming. They will not tell you if a floor system needs reinforcement, which is a structural engineer's call. If you are uncertain, talk to a builder before the table ships.
Plan Traffic Flow as if the Table Lives There
The other rooms in a house are usually planned around how people move through them. A billiards room often is not, and the consequence is a layout where every path through the room crosses the cue arc.
The fix is to plan the traffic patterns before the cabinet lands. The door to the room should ideally not open onto the long side of the table. The path from the door to a wet bar, a TV wall, or seating should run along the short side, not across the play area. If the room is rectangular, the table almost always wants to sit lengthwise along the long axis, with the short ends pointed at the entry and the wall opposite.
This is also the moment to decide whether the room is a single-purpose billiards room or a multi-use space. A multi-use space with a TV wall, a sectional, and a wet bar can absolutely accommodate a pool table, but the table needs to claim a clear playing zone with the cue arc protected. A dining-top conversion, available on most C.L. Bailey models, lets the same footprint serve as both a billiards table and a dinner table when the cloth is covered, which solves a different version of the same multi-use problem.
Spectator Seating Should Be Planned, Not Improvised
A finished billiards room reads as such because there is somewhere to sit when you are not at the table. The fix is not a stack of dining chairs along a wall. It is a pair of spectator chairs sized to the table, set at the long side, with enough setback that a cue stroke clears them.
C.L. Bailey makes spectator chairs in matching collections (Skylar, Viking, Tunbridge) so the seating reads as part of the room rather than as accessory furniture. A bench at the short end is another option in tighter rooms, particularly with a window above the bench. A wet-bar counter on a back wall, with bar stools, doubles as casual seating in larger rooms. Whatever the choice, it should be placed at a setback that respects the cue arc.
Cue racks belong on a wall the table does not face, where they read as functional architecture rather than as clutter. A floor rack at the head of the table is a workable alternative. Either way, the rack is a furniture decision and benefits from being in the same finish family as the table.
Wall Treatments and Color Decisions
A pool table is dark hardwood and felt. The room around it reads more or less calmly depending on what is on the walls. A monochrome treatment, particularly in a warm gray or a deep neutral, lets the table center the room. A heavily patterned wallpaper or a saturated color tends to fight with the cabinet, particularly under warm overhead lighting.
If you are choosing a felt color at the same time, lean toward a tone that connects to the room rather than calling attention to itself. A deep green is the traditional choice and reads well against most wood finishes. A blue-gray works in modern rooms. A burgundy reads more formally. Bright reds and bright blues are striking in photographs and tiring in a room you spend hours in. The cloth swatch tool at /products/cloth gives a fair preview, and your dealer can hand you physical swatches before the table ships.
Art on the walls should clear the cue stroke. A piece hung over the long rail at six feet six inches will not get clipped by a cue, but a piece in the corner where a player sets up a tight angle absolutely can. The conservative move is to leave the cue-active walls clean and put art on the short ends.
Acoustics, HVAC, and Climate
A pool table is built from solid hardwood, and solid hardwood expands and contracts with humidity. A room that swings between dry winter and humid summer will move the cabinet through a small annual cycle, and the slate substructure under the cloth absorbs most of that movement without losing level. A room that swings dramatically (a poorly conditioned basement, a converted detached garage, an unheated outbuilding) is harder on the table.
The right target is residential interior conditions: roughly 35 to 55 percent humidity, 65 to 75 degrees Fahrenheit, with the swings small enough that the wood does not cycle through extremes. If the space is a basement that runs damp, a dehumidifier is a worthwhile addition. If it is a converted garage, conditioning the space before the table arrives is worth more than any single accessory you could buy with the same budget.
HVAC supply registers should not blow directly down on the bed. A diffuser that aims air across the room rather than at the table is the right configuration. If you can locate the supply on a wall or in a soffit rather than the ceiling directly above the play area, the table will live more comfortably.
Plan for Installation Day
A pool table installation is a half-day event. The cabinet, slate, rails, and cloth all arrive on the same truck, and the installation crew assembles, levels, and stretches in place. This is not a project that gets finished by a single person on a weekend. The slate is heavy enough to require multiple people, the leveling sequence is precise, and the cloth stretch determines how the table plays for the next decade.
The room needs to be clear on installation day. That means furniture moved, the floor swept, the lighting fixture installed and centered, and a clear path from the front door to the room itself. The crew will measure thresholds and turning radii on arrival and will tell you if a piece needs to be hand-carried up a stair. If you live in a tight stairwell or a narrow hallway, mention it to the dealer at quote so the crew arrives prepared.
Once the table lands and is leveled, the room is ready to live in. Cloth needs about a week of light play to settle, and a brand new cabinet finish wants a few weeks before you put a heavy planter on the back rail. Otherwise the work is done.
The room you build around the table determines whether the table reads as architecture or as equipment. A planned room reads as architecture from the day it is finished.
Where to Go from Here
If you are early in the process, the cluster of room-planning guides covers the specific decisions in more depth. Room sizing is at the minimum room size guide. Lighting is at the lighting guide. The model lineup is at /products/pool-tables, the spectator seating is at /products/game-room-furniture, and the dealer locator at /dealer connects you to the nearest authorized dealer for room-specific advice.
A pool table room is not a quick project. The rooms we like best are the ones the owner planned with a tape measure and lived in once before everything was bolted down. The goal of this guide is to make sure the once is right.